Warning
You are reading an old version of this documentation. If you want up-to-date information, please have a look at 2025.11 .First startup
This chapter guides you from unpacking your elements to the start of your Asycube.
Mount the Asycube
Unpack the Asycube
Use the holes in the base plate of the Asycube ( see Mounting the Asycube) to fix it to a solid base with the following screws :
Asycube 50 |
M5 |
Asycube 80 |
M5 |
Asycube 240 |
M6 |
Asycube 380 |
M8 |
Asycube 530 |
M8 |
Tip
Refer to section Mechanical integration to get more information. A tight fastening of the Asycube to a solid base is necessary.
Connect your Asycube electrically
Connect your Asycube to a 24V DC power supply via an optional power cable.
Important
Incorrect wiring of 0V and 24V would cause irreparable damages and void the warranty.
(1*) |
24V PELV S-Power* |
(2*) |
0V GND S-Power* |
(3) |
24V PELV Power |
(4) |
0V GND Power |
(5) |
EARTH |
* Safety-Power has to be supplied to use backlight or outputs.
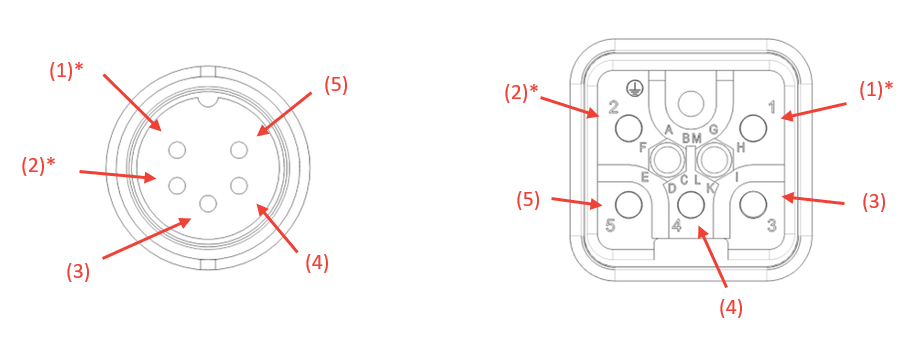
Fig. 3 Asycube 50/80/240 (left) Asycube 380/530 (right)
Characteristic |
Asycube 50/80 |
Asycube 240 |
Asycube 380 |
Asycube 530 |
Voltage |
+24 V DC + 5% |
+24 V DC + 5% |
+24 V DC + 5% |
+24 V DC + 5% |
Consumption |
5A |
5A |
4 A |
6A |
S-power consumption |
1A |
3A |
16 A |
14 A |
Tip
Refer to section Power connection to get more information.
Configure Ethernet communication (RJ45)
There are two ways to connect your Asycube. Either you choose to use our EYE+ system and can visit our documentation here . Or you can connect your Asycube to a computer and use our Asycube Studio software.
Change the IP address of your computer to be on the same network as the Asycube (Table 2).
Default IP address |
192.168.127.254 |
Default subnet mask |
255.255.255.0 |
Port |
4001 |
Tip
Check How to change the IP Address on your Windows PC? if you need help changing your computer’s IP address.
Note
Refer to section Communication to get more information.