Warning
You are reading an old version of this documentation. If you want up-to-date information, please have a look at 2025.11 .3. Vibration Sequence
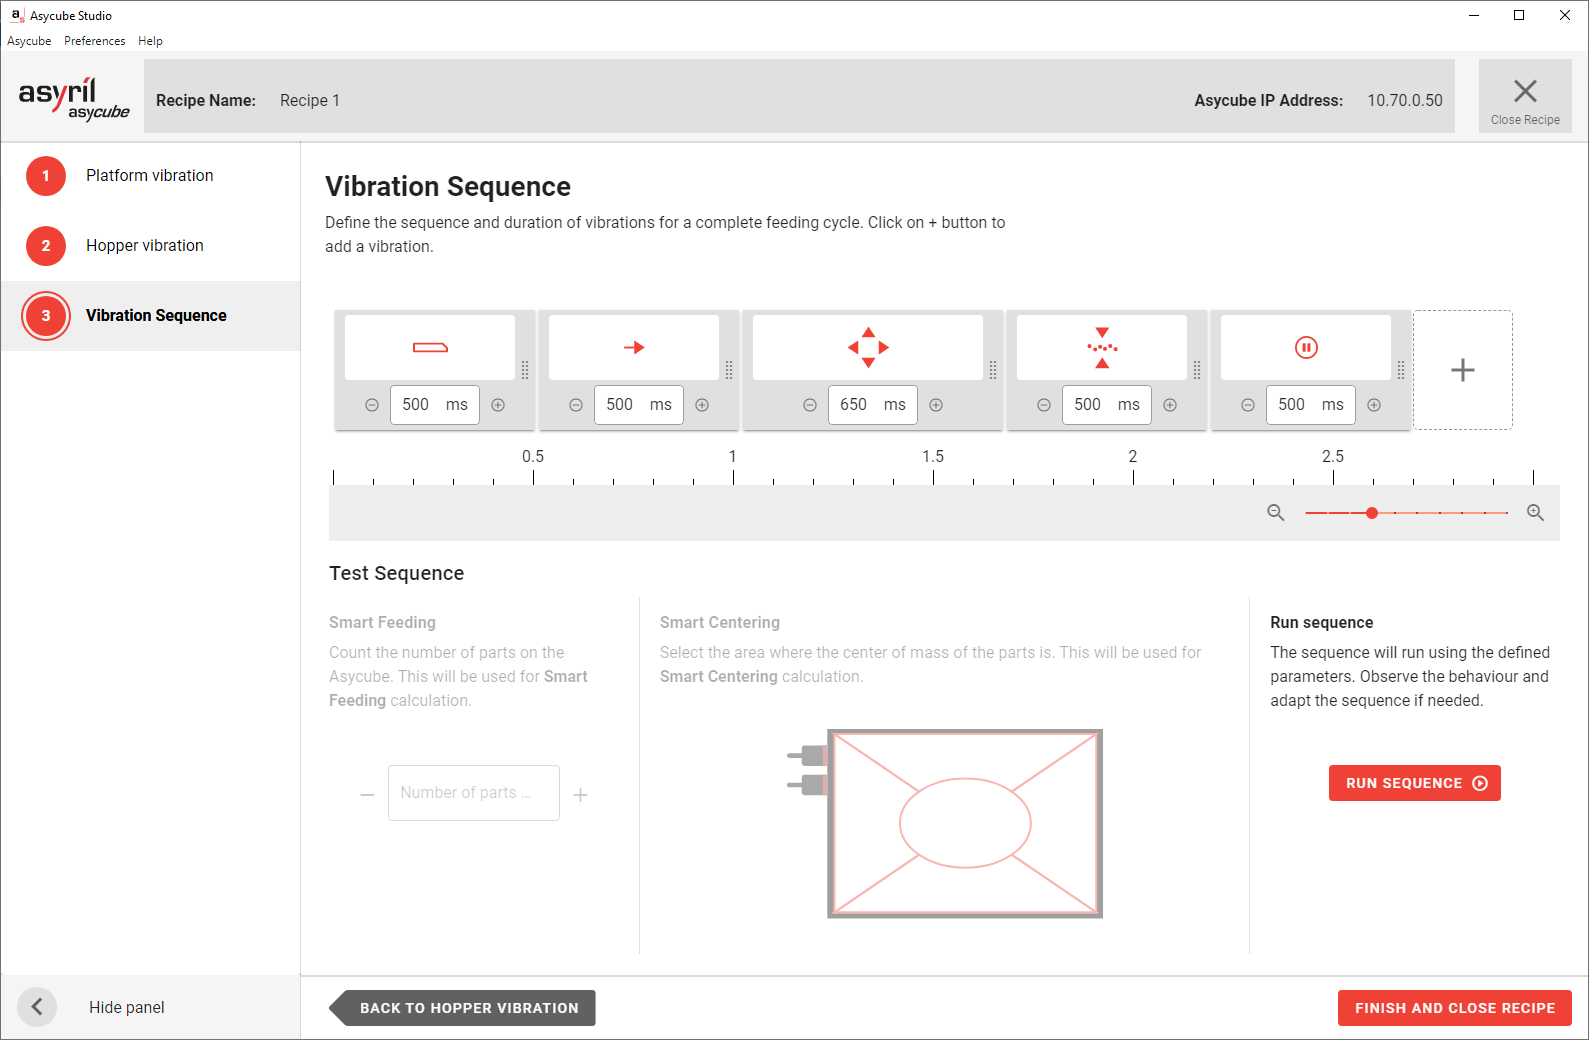
Fig. 99 Recipe Wizard - Vibration Sequence
The vibration sequence is the sequence that is executed each time the command ES - Execute sequence is sent to the Asycube. A typical sequence is most of the time composed of:
A feeding action: Fill the Asycube to be close to the optimal number of part.
A centering action: Center the parts in the middle of the Asycube.
Flip: Flip and spread the parts to avoid too much contact between each others.
Wait: Wait for the parts stabilization after the last vibration.
Vibration sequence goal is to bring enough parts well spread out in the Asycube to make it possible to detect new other pickable parts.
Start your vibration sequence by clicking on the + button and add an action. The explanation of each action is listed below.
Note
A vibration sequence can contain up to 7 actions.
Feeding actions
Smart Feeding 
This action should almost always be used in the beginning of a sequence. The smart feeding will automatically vibrate the hopper during a proportional time to fill the Asycube with the optimal number of parts.
The smart feeding duration depends on the initial number of parts on the Asycube. The more parts are detected, the less time the vibration takes and when the upper limit of parts on the platform is reached, the vibration duration decreases to zero. In between, the vibration duration is linearly interpolated.
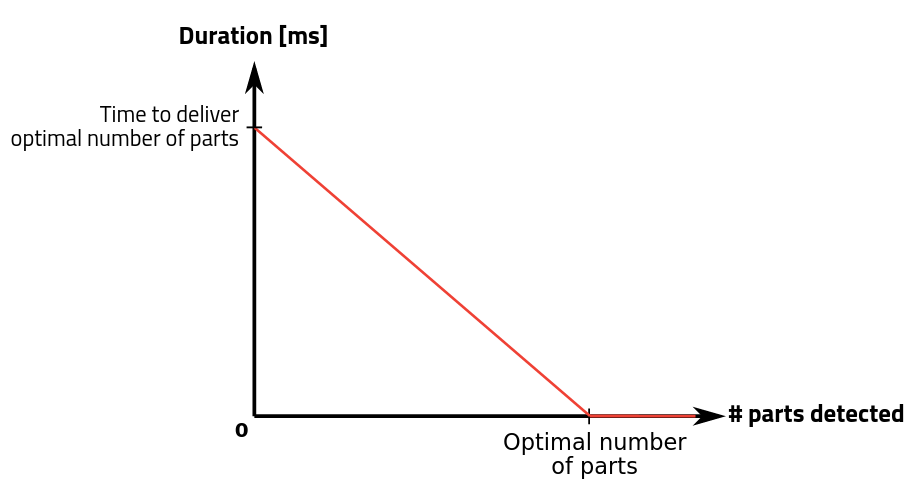
Fig. 100 Adjustment of hopper vibration duration using smart feeding
Example: Let’s suppose that the optimal number of parts has been defined at 40 in the previous step and the duration (time to obtain optimal amount) entered is 1000 ms.
In a first case, if no part is present on the platform, the effective vibration duration will be 1000 ms.
In a second case if 20 parts are detected on the platform, the effective vibration duration will be 500 ms.
In a third case where 30 parts are detected on the platform, the effective vibration duration will be 250 ms.
When 40 or more parts are detected, there will be no hopper vibration.
Hopper feeding 
The standard hopper feeding will always vibrate the hopper during the same fixed duration regardless of the number of parts on the Asycube.
Important
Using this vibration in a sequence is not recommended as it is hard to ensure that enough parts will be placed in the Asycube or worse, it could also put too many parts in the Asycube.
The advantage of this method is that the hopper vibration will always take the same known time.
Centering actions
Smart Centering 
The smart centering is used to center the parts automatically. It performs the best suited vibration among left, right, backward and forward vibrations to center the parts in the middle of Asycube from any initial position.
The duration of the vibration depends on the position of the center of mass of all the parts. The duration of vibration is proportional to the duration entered to cross the platform in the 1. Platform Vibration step.

Fig. 101 Sequence with smart centering
Important
It is important to set the vibration duration as the time the parts need to cross the entire platform in a given direction. The effectiveness of the Smart Centering vibration depends on well-adjusted parameters.
Note
The indicated time in the interface is the maximum time this action will take. The actual vibration time will usually be shorter.
Cross and Long centering  +
+ 
Note
These centering movements are only available on Asycube 240, 380, 530.
The cross centering vibration brings the parts on the vertical line in the middle of the Asycube and the long centering on the horizontal line of the Asycube. If these two methods are called in succession, the parts will be centered in the middle of the Asycube. The execution could be longer than the smart centering, but the advantage is that the execution time will still be the same from one sequence to the other during production.

Fig. 102 Sequence with cross and long centering
Other actions
In the other actions, you will find the individual movements that you tuned in the 1. Platform Vibration step as well as some special actions.
Basic displacements: left, right, backward, forward 


These displacements can be used to move the part in a specific direction. These movements can be very useful in the case of using a specific plate (holes, grooves) to orientate the parts in a more favorable position for robot pickup.
Flip 
The flip vibration is used to flip the parts in order to avoid too much contact between each other and to flip the parts orientation. It is strongly recommended to use this action in your sequence after any centering action.
Wait 
It is used to wait for the parts stabilization.
Important
You should always end your sequence with a stabilization time. This will ensure that the parts are not moving during the image acquisition phase. Having no or too short stabilization time could lead to picking issues.
Tip
The stabilization time can be lowered by using an anti-rolling vibrating plate.
Purge actions 

Note
These actions are only available on Asycube 240, 380, 530 where the purge is installed and activated.
These actions are used to control the behavior of the purge flap. When adding an open purge ![]() or close purge
or close purge
![]() action, you can adjust the duration that will correspond to the duration that the system will wait
before executing the next action in the sequence.
action, you can adjust the duration that will correspond to the duration that the system will wait
before executing the next action in the sequence.
Important
When the purge flap is open, do not use any other vibrations than left or right. If this constraint is not respected, the mechanism could be irreparably damaged.
Note
Purge actions will take the space of two actions. This mean that if you add both open and close purge actions, you can only add 3 other actions before reaching the 7 actions limit.
Tip
The purge flap takes about 3 seconds to open, so we advise to use at least this duration for a purge action.
Test your vibration sequence
Asycube Studio offers the possibility to test your sequence before running it in production in order to validate its efficiency. As Asycube Studio does not have access to a vision feedback, you will need to inform how many parts are on the Asycube and where they are placed. These two data will be sent by your vision system while running in production when executing a sequence via the ES - Execute sequence command.
Asycube Studio will not let you click on until the mandatory parameters are entered.
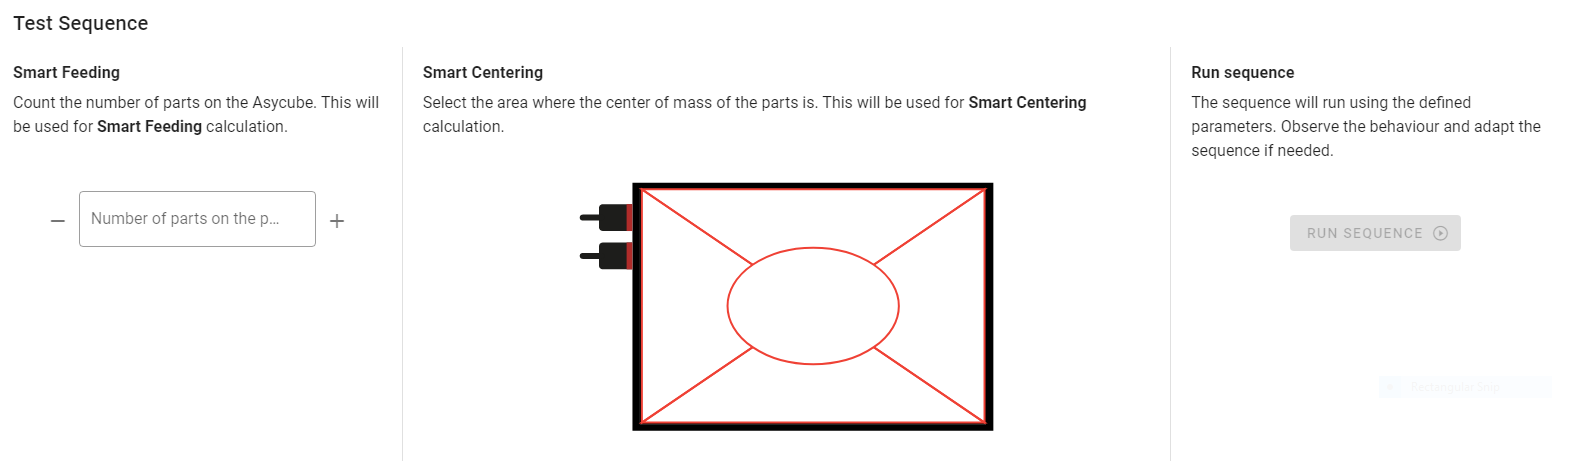
Fig. 103 Test sequence area
If you used a Smart Feeding ![]() action, count the number of parts on the Asycube
and input it in the first area.
action, count the number of parts on the Asycube
and input it in the first area.
If you used a Smart Centering ![]() action, observe the plate and click on the
area that corresponds to the center of mass of the parts on the platform.
action, observe the plate and click on the
area that corresponds to the center of mass of the parts on the platform.
You can then test your vibration sequence by clicking on . It will run the sequence and display the duration took to execute it.
Tip
Test your sequence with different scenarios (no parts onto the Asycube but hopper filled, optimal amount of parts on the feeder but all accumulated in a corner, etc…). At this point you should also be able to evaluate the cycle time your application will be able to reach by measuring the number of parts available in average after running a sequence.
Once you are satisfied with your vibration sequence, you can close the recipe using on the bottom. Choose to save the recipe. This will take a few seconds as the data is saved inside the Asycube. After that, you are redirected to the Recipes page.