Warning
You are reading an old version of this documentation. If you want up-to-date information, please have a look at 2025.11 .1. Platform Vibration
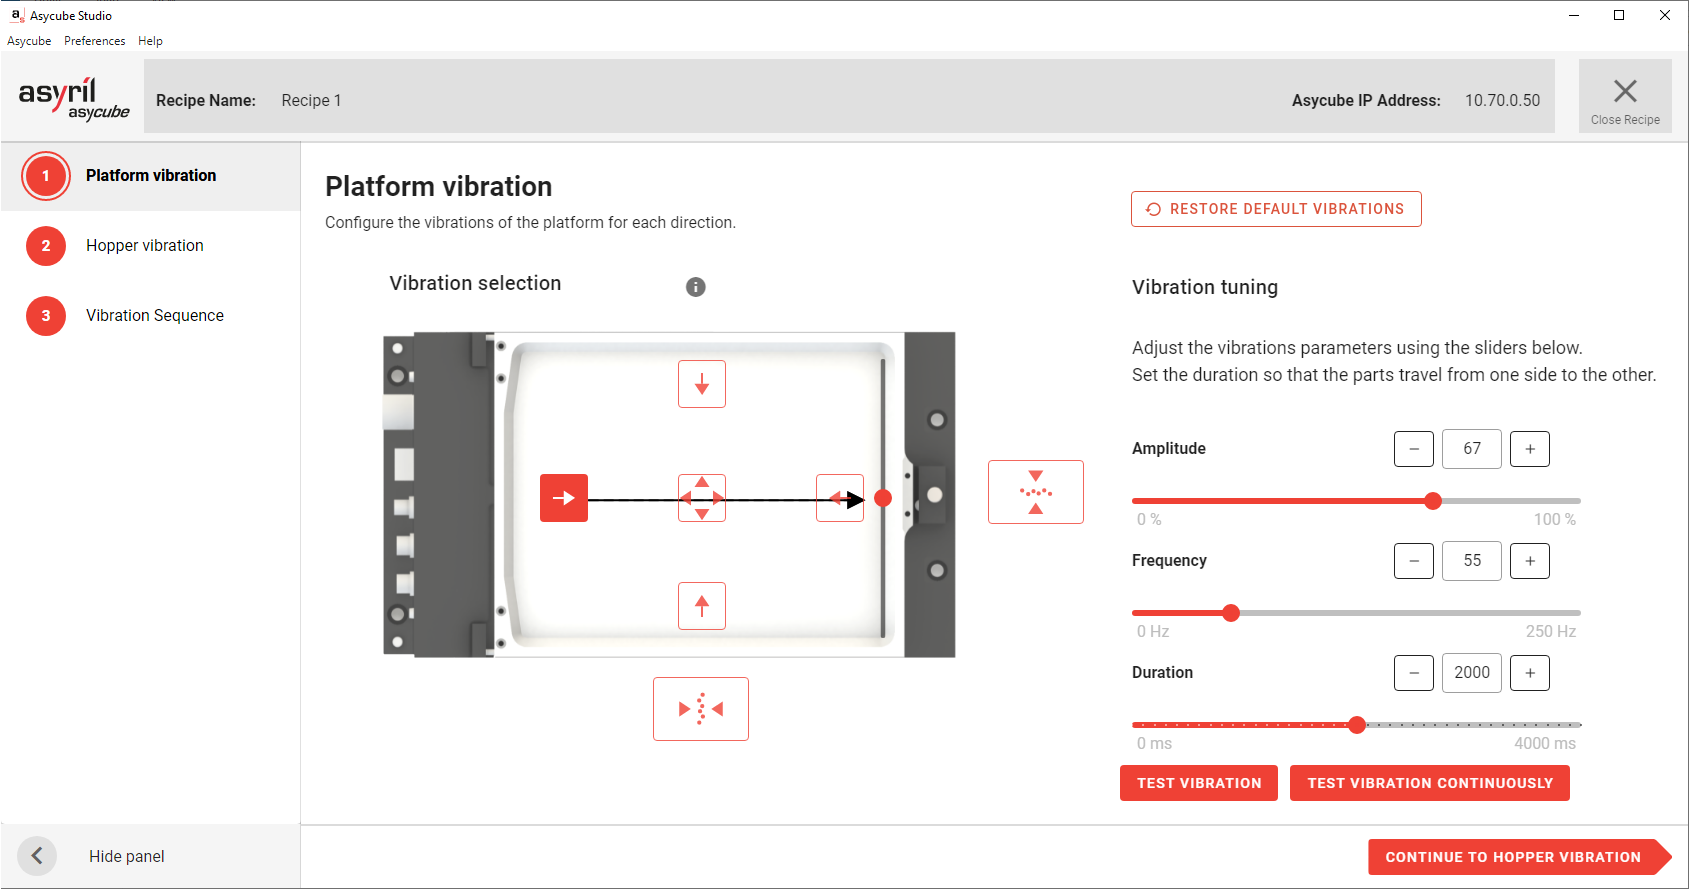
Fig. 93 Recipe Wizard - Platform Vibration
Depending on the Asycube size, five or seven vibrations must be correctly configured.
For all Asycube: five standard vibrations: left
 , right
  , backward
  , forward
  , flip
For Asycube 240, 380, 530: Two additional centering vibrations: cross-centering
 , long-centering
Tune the amplitude, frequency and duration
Each vibration must be tuned independently by clicking on the corresponding vibration icon and modifying its associated parameters on the right side of the window.
1. Amplitude and frequency
For each vibration, define the optimal amplitude and frequency. Click on the button to test the tuning. You can also use the continuous mode to tweak the amplitude or the frequency while the selected vibration is running, once finished, simply stop the vibration using the button.
Flip vibration: Find the amplitude and frequency allowing to flip the parts orientation on the Asycube. Increasing the amplitude makes the parts jump higher.
All other vibrations: The optimal amplitude and frequency produces a fast and smooth displacement of the parts.
Tip
For all the platform vibrations except the Flip, Cross and Long axis centering the frequency is usually the same. Once a suitable frequency is found for the displacement of the parts on the platform, it generally suits the other displacements as well.
Tip
Each Asycube is delivered with their own set of default parameters that provide a very good starting point for your tuning. Try the default amplitudes and frequencies first, and then adjust these parameters depending on your observations.
Note
High energy mode: For Asycube 50 or 80, the high energy mode can be used to increase the vertical amplitude for each vibration. This mode can be particularly useful to move parts on a specific plate with holes, or to flip rather large parts for example.
2. Duration
Once you have founded the optimal amplitude and frequency to guarantee a good behavior of the parts, set the duration it takes for your parts to move from one side of the Asycube to the other.
For standard vibrations (except Flip):
Put the parts on the opposite side of vibration and start the vibration by clicking on . The Asycube vibrations should end when the parts reach the other side of the Asycube. If not, adapt the duration accordingly until this is true.
For centering vibrations:
Put half of the parts on each side of the centering line and start the vibration by clicking on . Adjust the duration so that Asycube vibrations end when the parts reach the middle of the Asycube.
Important
Smart centering: It is critical to set the right duration of vibration for each direction. This parameter will be used as a reference when separating the parts during production (see Smart Centering in the vibration sequence).
Note
If you want to restore the default vibrations, click on .
Adjust vibration direction
If the parts do not move perfectly in the desired direction, you can correct the displacement error with the sliders on the sides.
Start the vibration without correction and observe the parts direction.
If the direction is not as expected, move the slider to add an offset in the opposite direction. For example, if at the end of the vibration the parts are shifted to the left when they are only supposed to move forward, you have to add an offset to the right in order to obtain a perfect forward movement (see left illustration in Fig. 94).
Start the vibration again to check if the correction yielded the expected result. If not, adjust the arrow until you observe the expected direction.
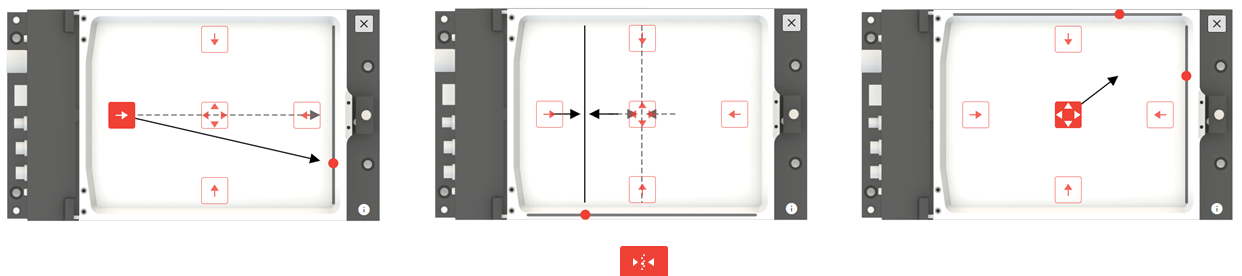
Fig. 94 Vibrations correction
Important
Adjusting the directions properly will avoid accumulation of parts on a side or a corner during production. It is important to adjust these directions carefully.
Purging system
Should your system have an Asyril purging system equipped and enabled, an extra button will be visible on this page, letting you open and close the purge flap. That way you can tune the vibration so the parts actually exit the plate.
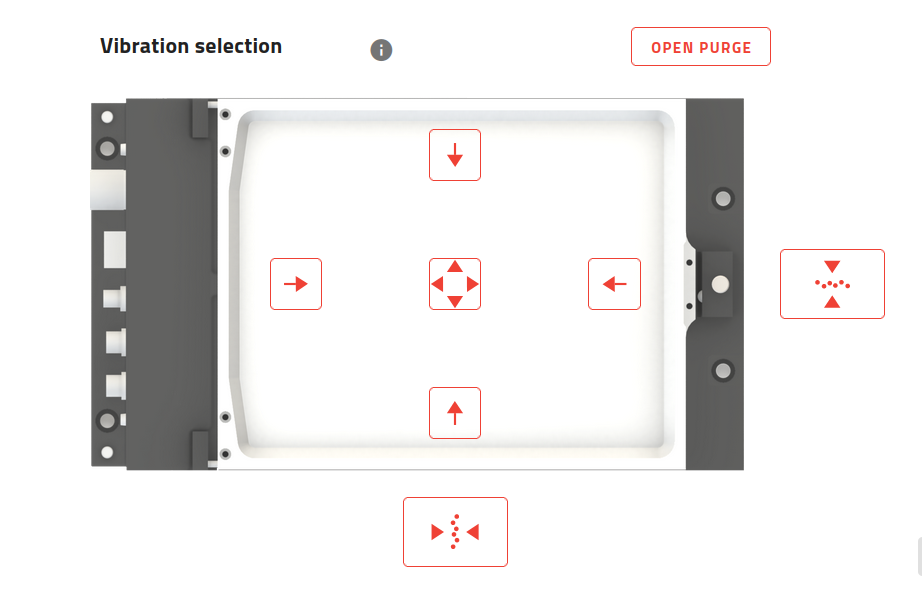
Important
When the flap is open, you should only vibrate the Asycube in the flap side’s direction. Using other vibrations could damage the purge actuator.