Warning
You are reading an old version of this documentation. If you want up-to-date information, please have a look at 2025.11 .Gateway connection
Power connection
Connect the 24VDC (130 mA) power supply on the naked plug provided with the Gateway

Fig. 121 Gateway power supply
Asycube connection
Connect the Gateway X2-IN port to the Asycube communication port with a RJ45 cable (See Fig. 122). The Asycube feeder MUST have its IP Address set to its default value 192.168.127.254. The IP Address of the Gateway X3 port is 192.168.127.1

Fig. 122 Gateway ethernet connection
Connect the Gateway to the machine controller
Connect the Gateway X3 port to the machine controller CC-Link with a CC-Link cable.
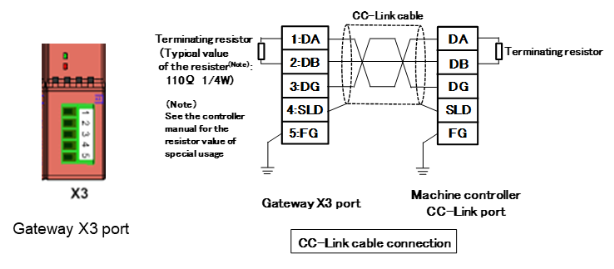
Fig. 123 Gateway CC-Link connection
Power ON
Switch the power supply ON to supply both the Asycube and the Gateway. Check the status of the Gateway LEDs:
SYS: steady green ON.
APL: blinking green with 2s OFF and 0.5s ON or steady green ON (if the machine controller runs).
X2 LINK IN (CH0) L/A: steady green or blinking green.
X3 LINK: steady green.
Other LEDs may also switch on or blink.
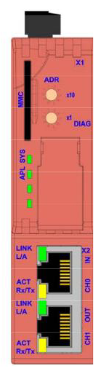
Fig. 124 Gateway Overview
Modify the station address
In some cases, you will have to modify the station address of the Gateway. The station address is defined by the two hardware switches. The address ranges from 1 to 64. Use a small flat screwdriver to turn the switches to the desired address.
Fig. 125 Hardware switch to change the station address